Showing posts with label knitting. Show all posts

Wednesday, April 3, 2013

A Place For Everything

My organizing philosophy has always been centered around the maxim that every room needs a junk drawer.  When that drawer gets full then you must organize the contents to either get rid of useless junk (like the bread bag ties in the kitchen junk drawer that I will never use) or to find a new home for things that can logically go together.

Everything and anything can go in a junk drawer but groups of like things need their own space.

The same goes for things needed for specific activities.  Your purse (if you use one) is like a portable junk drawer.  It usually includes individual items that are needed while out and about but it also accumulates lots of things that have no place else to live.   My check book lives in my purse but I have rarely written a check outside the house in years. Lip balm is used at home, most of the time, but my purse attracts them lie flies to honey.

I have specific tote bags for my library books, my swimming stuff, my knitting projects (multiple bags!), the Quilt Guild Library records, the Quilt Show Garage Sale records and even a special bag for the dogs' medicines.

What I did not have, until the other day, was a specific tote bag for the Knitting in Kingwood records. I had been using one that was too big for amount of stuff I needed to take to each meeting and it was very awkward to use.

Determined to fix this lack, and armed with my knowledge from a class with Gilbert Muniz a few years ago, I created this bag that exactly fits all the stuff I cart around for Knitting in Kingwood.

What do you think?

For the big bag, I used my embroidery machine for the label, some outdoor fabric from JoAnn's for the exterior, some buckram to stiffen it up a little, some leftover cotton fabric for the lining and some fabulous leather handles I have been hanging onto for many years. The little white bag, which fits nicely into the bigger bag, is made from some felted wool and holds the little bits and pieces I seem to need at the meetings like membership cards, pens and others bits.

Best part is, is that I can pass on this bag to the next leader and they will have everything they need in one place and won't have to go searching for membership lists, the copier card or organizational rules.

While the rest of my life may be spiraling into chaos at least my KIK materials are organized.

Tuesday, January 1, 2013

Oops! Shawl

This tale began on my birthday when the Jaunty Janetta gave me a hand-spun, hand-dyed lace weight skein of yarn.  It came from the FJCruiser shop on Etsy, and although there does not appear to be any lace weight yarn in the shop currently, the other yarns are gorgeous, reasonably priced, in a variety of weights and the colors are exquisite.

Such a wonderful yarn deserves a wonderful bit of knitting and I found the perfect pattern on Ravelry called the Monica Shawl.  Here is the link and I really want you to skip over for a moment to get a gander at this great shawl.

Notice the large size, the variety of stitches and that lovely spiky outer edge.  Gorgeous, right?

Although the pattern is written for sock weight yarn, I decided to use my lovely lace weight present.  I knew it would be a little smaller than the original but it seemed like a challenge I could successfully meet.

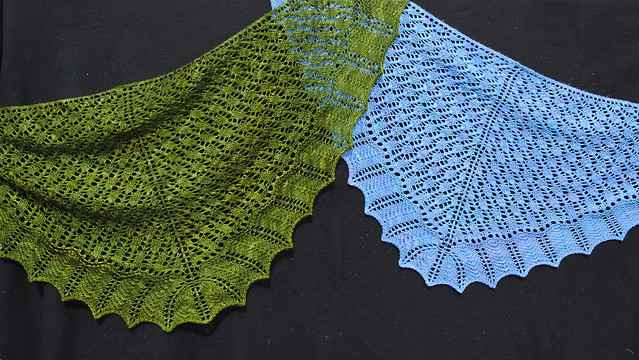
Here is mine in the colorway Flipper:

Beautiful effort with lots of pattern changes BUT what happened to the nice spiky outer edge?  It seems that I finished off the outer edge with a too tight bind off thus the spikes could not be stretched out to make the lovely spikes.

RATS!

I wear this a lot now that the days are cooled but I am still disappointed with my effort.  Maybe I should try it again?

Yeah, in another life!

Sunday, September 2, 2012

Lush and Plush

There are a whole series of fancy ribbon yarns out there that are meant to be joined together  into a lush boa-type scarf.  I made a white one a couple of  years ago and posted it here.  I wasn't happy with the white and thought I would dye it only to discover that a mostly polyester fiber really doesn't take dye very well.  I still have it in my scarf drawer and someday I will were it out.

But I digress.

The white scarf was made out of a yarn called Flamenco by Trendsetter Yarns and retails for about $17.00 a skein.  Not a bad price for a whole scarf  but a lot if you aren't happy with it.  Imagine my surprise when I was in Jo-Ann's the other day and saw a whole box of similar styled ribbon yarns price at $4.99 each.  Less than five bucks , especially after using a coupon, seemed like a great yarn for this type of scarf.  Here's how mine came out:

 The yarn is by Red Heart and is called Boutique Sashay.  The scarf is only six stitches wide and came out to about five feet long.  The color way is Tango and I am very pleased with the little bit of glitz in the yarn.  This one will definitely be worn..

I am glad that I did not read any reviews before I bought it though as there are lots of complaints about the quality of the yarn .. lots of complaints about breaks and worn areas.  Then again, this is not an heirloom piece so I don't expect to shed any tears if it falls apart after a few wearings.

This is great project to work on while riding in a car or watching kids' sports as there really is very little skill or ability to the knitting to get an acceptable product.

I did learn one thing while photographing this scarf.  I learned that the prickly vines really do hurt for a long time when they rub against your legs.  OUCH!  I will try to watch my step next time.


Saturday, August 25, 2012

Weave in ends and block.

Those are dreaded words for most knitters that come at the end of most knitting patterns. 'Weave in ends' is not the biggest issue but BLOCK can make me shiver with dread.

Blocking is the last step before you get to wear a knitted garment.  The goal is to get the item nice and flat and all those stitches evened out, with the flat parts flat and the puffy parts (think nups) puffy.

There are basically four ways to block an item:

  1. Throw it in the washer and dryer,
  2. Throw it in the washer and lay flat to dry,
  3. Soak it/wash it by hand then steam it to size or
  4. Soak it/wash it by hand then pin it to size. 

First you need to decide which way you want to wash it.  If you know the content of your yarn that can be pretty easy.  Anything that is 75% or more acrylic or 100% cotton can be safely thrown into the washer and dryer and it will turn out fine.  Acrylic and cotton yarns are simple because there is nothing you can do to make it get into a shape that it does not already have.  Anything with less acrylic or cotton should be tested.  Testing can be done successfully with your tension/gauge swatch.  You do make make tension swatches for every project, right?

Some yarns you just know should not be washed and dried in your  laundry machines.  100% wool will felt in the washer and dryer no matter how you handle it.  If you want felt, that is all well and good but if you don't, please avoid the laundry room.  Many super wash wools ask you to wash in the machine but dry outside of the machine.  Fancy yarns usually like you to handle them more carefully...hand wash and pinning.   Lets look at the four ways of blocking your project.

1.  THROW IT IN THE WASHER AND DRYER

This is not an official blocking method but it is useful to know.  This is the simplest way to block something but there are a couple of cautions.  First don't use hot water or cold water.  Room temperature or tepid water are just fine.  Most cottons will bleed color so don't put your best white blouse into the same wash...unless your knitting is white.  I also toss in a few color catchers to soak up that extra color.  Do not use your toughest cycle, normal or permanent press cycles only.  Acrylic items tend to dry just fine on normal and permanent press dryer cycles while heavy cotton items sometimes need extra drying time.

2,  THROW IT IN THE WASHER AND LAY FLAT TO DRY

This is how I handle super wash wool items and most anything with 25% acrylic content.  I generally do my socks this way.  I will wash them in a normal wash in the washing machine with other knit items then dry them on sock stretchers.  Sometimes though I have found that the strecthiness of the socks just doesn't come back after washing and blocking on stretchers.  When that happens I wash them again and put them right into dryer.

3.  SOAK IT/WASH IT BY HAND THEN STEAM TO SIZE

This is the way I handle odd shaped items that should never go into the washing machine. It is also the way I wash my hand embroidered items like cross stitch or linen work. Think of all-wool sweaters or odd shaped wool shawls and you get the idea.  In this instance. you fill up the kitchen sink with tepid/room temperature water and some gentle liquid soap.  I use liquid dish soap or Soak.  I prefer liquid dish soap even if I have to rinse it a lot because sometimes perfumed Soak makes my nose unhappy.  Gently immerse your item into the sink after the soap has dissolved and leave it for several hours.  You may gently agitate it every once in a while but the important thing is to let it soak for an extended period.  This will relax the yarn and make it easier to flatten it all out. Remember to wait for several hours before going on.

Gently remove your item from the soap bath and gently rinse it in tepid water until the soap has been removed.  Gently squeeze out excess water and lay out your item on a large bath towel roughly in the shape that your want it to take.  Roll up the towel around your item and leave it to damp dry for a few hours.

Unwrap your towel and lay your item on a flat surface that is water resistant and heat proof...I use my big ironing board.  Gently tug your item into shape and press it flat with a steam iron.  I put the iron down then pick it straight up and press the next section.  I start at those edges that may be curled from knitting and work on them before going on to the body of the item.

Let the item rest flat covered by another towel or two overnight until completely cool.  Store your item folded or flat on a shelf, out of the sun but exposed to air.

4.  SOAK IT/WASH IT BY HAND THEN PIN IT TO SIZE

This is the preferred method for blocking those lacy shawls made out of wool that we all love to see but dread to block.  Start off the same way as the method above right up to the unwrapping from the towel.

With a spray bottle of clean water on hand, for re-wetting, if necessary, lay out your item on a flat surface.  Also have on hand blocking wires, stainless steel pins and a large pinnable surface (could be your carpet or a special mat or an extra large cutting board which is pinnable).  Carefully thread the wires through the edges stitches of your item...yes, every edge stitch.....then use the pins to pull the wires apart stretching the item to within an inch of its life.  Yes, this can take a lot of time.  Yes, it is worth it.  For curved edges just pin the tips, again stretching until well stretched.  Leave your item to air dry...usually several hours.

You could skip the wires but then you would need to pin every edge stitch as well as the pointy bits.

Remove the wires and pins and gently fold the item, matching the edges and ends together then let it rest between a couple of towels on a flat surface with a pillow or two on top of it.  Leave it over night and the next morning you will be extremely pleased with how your shawl looks.  This last step is recommended by Nancy Bush and really does make for a better product.

So that's my take on blocking knitted items.  There are hundreds of You Tube videos and articles available on the internet which have their own take on this topic but these are the four methods I use so they might be useful to you.  Some links you might enjoy are listed below:

Basic lace blocking on Knit Picks
Knitty's take on blocking (pretty funny in parts)
Knit Simple's instructions
http://www.youtube.com/watch?v=BfwAkgtitwE - a nice video
http://www.youtube.com/watch?v=7fQitQ2j8AI&feature=related - an early Knitting Daily episode

Monday, August 6, 2012

itty-bitty hats

itty-bitty hats by Susan B. Anderson has got to be one of the best little knitting books I have ever used.  I recently got a copy as a door prize at a Knitting in Kingwood meeting and have been using it the past week or so to complete my Olympic challenge for myself.  That challenge was to knit a hat a night for the Head Start kids in Humble and this book has helped me accomplish that goal...at least so far.

This is a beginner book with nothing a beginner could not accomplish but with enough interest for the intermediate knitter.  About 80% of the hats are based on a simple beanie pattern and, although tedious to the experienced, every pattern repeats all the instructions for the basic construction.  No flipping pages to refresh your memory on how many stitches to cast on or how to make the crown shaping.  It is all there in every pattern.

It is spiral bound so it lays flat, the type face is clear, the pictures are adorable and there is enough inspiration to keep you going for a very long time.  There are about fifty pages in basic knitting instructions with lots of clear illustrations...perfect for those who want to get into knitting in the round without committing to a lot of different yarns and needles. One of the patterns is for a hat that looks like a frosted birthday cake that sent me off to a spiral variation that turned out very well.

All the yarn used is of the same weight so you can just go to your KYS and pick up a bunch of coordinating yarns and you are off to the races.  I made about ten hats from three balls of Plymouth Encore and here is how a couple turned out...

Cute, right?

The one on the right is the basic hat with a little i-cord topping while the one on the left is a variation from the book.  The one on the left is not to designed to cover a child's ears so you need to add some rows if you want that feature.  There is a bonnet style hat shown in the book that I have not tried but I can't believe it will be harder than the other styles.

I don't know if I will meet the challenge of a hat a day during the Olympics, now that the emphasis has moved onto the Track and Field, but this book is one I will keep using for many years to come as a jumping off point for many more itty-bitty hats.

And just for some comic relief...and since he rarely looks at this blog....here is a picture of a very shaggy Paul walking Alex.

Monday, July 23, 2012

Knitting A Long with KNOT

I belong to a couple of chapters of the Knit At Night Guild (KANG), one here in Kingwood (Knitting in Kingwood or KIK) and one in Spring (Knitters North of Town or KNOT).  Recently both groups have been doing KALs (Knit A Long) with various lace patterns.  The KIK KAL, which I am trying to facilitate I wrote about a couple of months ago.  The one we have been doing in KNOT I just finished.

Here it is:
I think it is gorgeous but it almost never happened.

Here's the back story.

It was announced that KNOT would be doing a KAL for the summer.  The pattern chosen was the Panda Silk DK Fan Shawl and we were all encouraged to try it out.  I was not impressed by the samples as they seemed way too heavy for me and the pattern looked like a bunch of little tiny bits(the fans) that were all the same.  How could this be a fun thing to knit?

I decided I would try another pattern and ordered a TON of lace weight yarn from Knit Picks - FIVE skeins of Gloss Lace Yarn  ... that's 2,200 yards of the stuff.  The color I chose was on clearance so I did get a break on the price BUT what was I going to do with all that yarn when the pattern I chose defeated me.  I won't share the name of the pattern I was going to try as it has completely left my home for its rightful pace in the recycling bin.

Instead of crying over an unfortunate purchase I decided to discard what I had already tried to knit up in the previous pattern, I gave one skein away for the KIK KAL, used up about one and a half skeins on this shawl and will use up the remaining two skeins making hats for the kids at the local Head Start Program.

Did you notice that I did not use DK weight yarn but something a whole lot finer - Lace Weight (on size 3 US needles if you care)?

Instead of this pattern being an icky picky knit, it was actually enjoyable.  The 29 row pattern was easily memorized and if you messed up the corrections would be easy, or, in my case I just kept going.  What's a stitch or two off between friends?

The big bonus for me was that I didn't have to join all the little fans together because it was all knit in one piece...by finishing one fan then picking up stitches from it to start the next.  I will admit there were a lot of yarn ends to clean -up but I think it was worth it.

Mine came out to about 70" long by about 24" wide... a nice size for the movies.

I can't wait to show the other members of KNOT that I got it done because it looks so different from the standard DK weight shawls most of them are doing.

Now I need to decide what to knit while watching the Olympics.  Last time I made socks...this time i think it will be hat for little kids from the  Itty-bitty hats book I won as a door prize at KIK the other day.

And yes, they will be mostly pink!

Friday, June 1, 2012

Lace KAL

Sometimes a random thought just takes over your life.

Nothing too loud or strenuous, just a little tickle that says...this is a good idea, you should try this, be a rock star.

Okay, maybe not a rock star, but I know you know what I am talking about.

The little idea was presented to me during a telephone call from another member of Knitting in Kingwood (KIK).  It had been suggested to her that the two of us work on a Lace Knit-a-Long (KAL) for KIK.  A KAL is when several individuals commit to knitting the same project at the same time.  It is a great way to stretch your knitting skills, learn a new technique and discover any potential problems with the pattern.  Our KAL would last all summer so it needed to be a little complex but not impossible for the average lace beginner.

My Long Sweater Jacket was a KAL.  Most people finished it in a couple of months.  It took me much longer but the comments from the other knitters really helped me to make something that fit me rather than too small like most of the other sweaters I saw.

Teresa and I looked for a pattern to use.  At first I thought we would use the Nancy Bush sampler scarf as the pattern but I found one in Love of Knitting that clearly would make a great KAL.  The pattern is called the Lacey Green Scarf by Ginger Smith and this is how mine came out:

Okay so it's not green but it is certainly lacy and it is a scarf.  The yarn is Shadow from Knit Picks. The Lilac color was a closeout and cost me less than $5.00.  I love the drape and I must admit that I am learning how to count these lacy patterns most of the time.  This pattern is well written though complex and you do need to pay attention to what you are doing.  Mine came out to about five feet long and eight inches wide at the ends to about six inches in the middle...and that taper was part of the pattern!

I did not notice any huge problems until I was blocking it out.  I discovered that I reversed a couple of rows which made one of the patterns a little wonky.  I probably should have re-knit that portion but my lazy side took over and now I just point it out to people.

Hey, this is a learning experience not a contest...right?
 
Why do I keep torturing myself like this?  Well, there is this little voice that keeps telling me to try something new, it's a good idea, you could be a rock star...at least in my little bit of the world where all things are possible, even wonky knitting passing itself off as lace.

Tuesday, May 29, 2012

The Problem with Knitting

I was cleaning up my knitting supplies the other evening and decided that there is real problem with knitting.  Not so much the actual act itself but the amount of stuff you can accumulate in the pursuit of knitting.

To knit successfully all you need to is a pair of sticks, a length of string and the knowledge of six techniques - knit stitch, purl stitch, casting on, binding off, increasing and decreasing.

Everything else is a variation on the basics.

Let's take those sticks as an example.

Most beginner knitting books suggest that a beginner purchase a set of needles and a skein of  yarn.  Already the beginner is in trouble.  There are a huge variety of knitting needle sizes depending on the tradition you are following or where you shop.  There are US sizes as well as needles sized based on millimeters.  There are little gadgets that help you determine which size needles you have.  I have one that shows US sizes, millimeter sizes,  Canadian sizes, UK sizes and French sizes.  The typical beginner size of needles is a size 8 US.

Once you have determined that you have the right size of needles you need to determine the right type of needles.  Needles come with single points and double points, can be long or short, with long or short cables and made from plastic, celluloid, metal or wood.  Heck, even your figures can be used as the sticks for a knitting project.  Typical beginner's sticks are single pointed and short (about 8"long).

(While cleaning up my knitting needles I came up with about 100 different sets of needles, some that I have purchased, some that I have received as gifts, some that I inherited from my female relatives and some, I am sure, were created by little knitting elves.  I whittled it down to only one size of each needle in each type which took it all down to about fifty sets.  The discards have been further whittled down to those that are actual sets, which will be donated, and those for which I don't have a whole set. Not sure what to do with those but I am looking around for ideas.)

Then we come to the yarn.  Some skeins of yarn are called worsted weight in one region, can be called DK (double knitting) weight in another.  The amount of yarn, in yards or meters, varies by the total actual weight of the skein which may be stated in grams or ounces.  A combination of the actual weight of the yarn with the length of the yarn in that weight determines what you call it...lace, DK, worsted and many others. Over and above this yarn can be made out of anything that can be spun.  Cotton, linen, wool, acrylic, silk, rayon and bamboo are all on the shelves these days.  Each fiber has different characteristics as to durability and cleaning. There are many weights of yarn from lace weight to super bulky.  The typical starting weight of yarn is worsted weight and made out of acrylic fibers.

(My yarn stash is in better shape than my needle stash as I have a use for each skein, no matter how acquired.  I do have a little problem with bits left over from completed projects but they are slowly, very slowly, making it into caps for the pre-schoolers at the local Head Start program this coming Christmas.)

So here is our poor beginner with six sets of needles called size 8, twelve skeins of worsted weight yarn and they have not even read the first page of instructions.

There are also lots of other tools you can purchase, like stitch markers, yarn needles, cable holders, rulers, scissors, yarn barns and a million other tools but sticks and string get you started.

Once you actually decide to learn how to knit, you then need to determine your style of knitting.  There are two basic types, picking (also called Continental) and throwing (also called British).  There are also many variations depending on the local tradition.  Before you even take your first stitch you need to build your foundation row by casting on.  Every teacher of note has their own favorite cast-on from simple to complex and I am sure there are whole books discussing the merits of each style.  The complexity of such a simple activity as knitting, can turn off the most dedicated student.  The most basic is called a Backward Loop Cast-on and even my middle-schoolers can master it in about ten minutes.

Do you see where I am going here?

I love knitting but I am getting overwhelmed by the stuff.  The stuff can consist of the tools and materials but it also consists of the knitting police who will tell you a better way to do something even if you are getting good results from your method.

How do we combat the problem of knitting?

May I suggest the following:

  • Buy only what you need and keep track of what you have on hand.
  • Use what you buy in specific projects not stored for 'something' in the future.
  • Learn to knit, and continue to knit with, people you like rather than with 'experts'.
  • Take a class or two with the understanding that you will learn only a few new ideas per class.
  • If it works for you then it is right, if it doesn't, ask a good friend for their method.  It might work or it might not.
  • Discard the stuff you hate...donate it, un-ravel it or just chuck it.


I have all my knitting stuff under control right now, even to ignoring expert advice with a smile rather than a scowl.

Don't let your knitting stuff get you down.  Just sit back, turn on a movie, pick up your sticks and string and make something.

Sunday, April 29, 2012

Sock Knitting Master Class

No, I did not take a master class in sock knitting but I did buy a book of the same name that was written/compiled by Ann Budd, a knitting rock star.

The book is very comprehensive and you can find great information on all aspects of sock knitting.  It even discusses all the various ways to knit a sock with different tools... four or five double pointed needles, two circular needles, one circular needle and the magic loop method.  The DVD is pretty good and if you are a visual learner the DVD is a real bonus.

What I like is that the author is not married to a single method of knitting socks.  Every method I have ever heard of for top down and toe up knitting is included.  You can sample the methods and find what you like or dislike before committing to a full set of double pointed needles or short circular needles or more importantly, purchasing patterns or books using a particular method that you find out that you hate.

I tried out one of the patterns for toe up knitting by another knitting rock star Cat Bordhi.  Cat is known for her use of two circular needles to create her toe-up socks and the pattern also introduces Judy Becker's 'Magic' cast-on (not so magic, just tedious IMO) and Jeny Staiman's stretchy bind-off (good choice for the sock pattern I tried).  The pattern is called Pussy Willow Stockings.

This is how they looked in the book:
Very pretty!

Here is how one of mine looks:

Not so pretty but definitely adequate.  The yarn I used is from a company called Nako and is 50% wool and 50% acrylic so they should be very durable.  I like the variety of colors in them though the yarn had a tendency to split while I was working with it.  I have no idea where you could buy this yarn as I received it in a yarn swap this past Christmas and I see on the website that this yarn is made for the Turkish domestic market.

The instructions were well written though you really need to keep your eye on them or you could easily get lost.  As in most books like this, every pattern is by a different sock designer so you can get a good overview of each designer's style.  The pattern I used will probably lead me to seek out other patterns by Cat...though I will probably not use her two circular needle method of construction as I am addicted to my beautiful double pointed needles from Knit Picks.

If you want to sample different sock knitting methods this is the book for you.  It is not for the beginner for their first sock....that pattern would be the 100 gram sock pattern in this post.  I'm going to try some more patterns from the book as there are some other intriguing construction methods just itching to get on my needles.

Sunday, March 11, 2012

The Last UFO

The Last KNITTED UFO (UnFinished Object) to be precise.

Why is this such a milestone for me?

In general, I tend to have about three knitting/crocheting projects going at anyone time.  Usually there is a pair of socks, a hat or scarf project and one bigger project (think sweater or complex lace) on my needles at any one time.  My theory is that socks are great for when I am being a couch potato, hats and scarves are great for knitting group gatherings and bigger projects are good for long movies or car trips.

There really is a method to my madness.

BUT, I must confess that the larger projects sometimes get hidden away because they become boring to work and I lose interest in them.

My last UFO was from a kit I purchased in Canada about six years ago.  Called the Sweater Bitz Kit it contained an ultra suede vest without sides and lots of various yarns so that I could knit up sleeves and side panels to make the vest into a jacket.

Seemed like a good idea at the time.  All the different yarns were cut into three yard lengths and the knitter was assured that there was enough yarn in the kit to make even the largest size provided.

After reading the instructions, I divided the yarns into two equal piles so that each sleeve/side combination would have similar yarns in them.  In a hotel room, with lousy lighting, I began this soon to be UFO.

What changed my enthusiasm from 'wow, I need to wear this next week' to 'let's just hide it away'?

THERE WASN'T ENOUGH YARN IN THE KIT TO FINISH THE KNITTING IN MY SIZE!!!

When I used up half the yarn in knitting one sleeve with side extensions I found that I needed about another 200 yards or so of yarn to finish it up.  I put aside the first sleeve/side and started on the second...just to see if I was wrong.  I wasn't.  Second side needed just as much extra yarn.

Into a bag the whole thing went and once in a while I would pick up additional skeins to finish it up.

A couple of weeks ago I committed to finishing it up and this is how it looks today:


The color correction is a little off as the pre-made vest portion is black, not dark grey.

I still have a little hand sewing to finish it up.  In the end I added a lining to the knitted portion to stabilize the stretch as the knitted part is quite heavy and would 'grow' over time.

The textures of the different yarns are wonderful but I don't know if I will ever finish up the hand sewing needed to finalize the sleeve and side side hems on the right side of the photo because I am not in love with this project any more.

To add insult to injury, the size I chose is a little small and I should have made the side panels a little larger for an attractive drape.

The company that packaged the kit no longer carries this item and the retailer I bought it from seems to have disappeared from the web soon after I bought this kit.  That should have been a clue!

I am now UFO free and intend to set up another set of three projects to meet every eventuality.  I already have one of the three dedicated to making hats for kids at the local Head Start facility for their Christmas Party later this year.  Three hats done already!  The other two will probably be a great sweater with a kangaroo pouch in the front, that I have been itching to start, and an interesting pair of cabled socks to round out the 'in process' pile.

No knitting/crocheting UFO's ...YEAH!

Zillions of sewing UFOs to go.  :-)

Tuesday, February 28, 2012

Bushwacked!

In April, Nancy Bush, a rock star of the knitting world, will be in Houston offering two classes for local knitters.  I am fortunate enough to have made the cut to get into the class.

Making the cut does not mean that I have the skills needed to master her lace knitting techniques, it just means that I followed the rules for submitting my money to pay for the class.

I have long admired her work for many years in Piecework magazine. Her specialty seems to be knitting techniques from Estonia and other Baltic countries.  I don't know if it was one of her articles but once there was an article about a knitted wedding shawl, about the size of a double bed quilt, that could be pulled through a wedding ring.  AWESOME!

Quick, do you know where Estonia is located?  (hint: further north than I thought :-()

Anyway, I got into her lace class while the other day will be spent on knitted gloves, a topic that does not interest me in the least.

I decided that instead of just going in blind to the class I would pick up her book on lace knitting and read up on her work.

'Knitted Lace of Estonia' is a beautiful book with lots of narrative and an excellent selection of knitted lace patterns as well as information on how the knitter can create their own patterns from the many motifs and construction details provided.  There is even a DVD  that adds a personal touch to the book's contents.

After reading the introductory chapters I decided to take the plunge in and try one of the patterns.

My choice was the 'Lily of the Valley Scarf' on page 90.  I didn't have the yarn called for in the pattern so I used a skein of Noro Kiramaki, a wonderful variegated lace weight yarn multicolored from beige to brown to pink to lime green.  It is similar to their Sekku line with the only major change is that the rayon is replaced by cotton.  Kiramaki is not being made any more so you would have a hard time reproducing this:

The number of mistakes in this scarf are almost too many to count but by the clever camouflage of the variegated yarn means that they do not stand out from the correctly knitted portion.

For fun I ran it through a ring to see if it would fit. (it does!)  It also camouflages the subject of this post.

After a couple of weeks of knitting diligently from this wonderful book, I blocked the scarf, to straighten out some of the knitting.  As I sat on the couch last evening to clean up the loose yarn ends Alex hopped onto the couch for a game of fetch with his knarly old Nyla Bone.  The scarf stuck to the bone and, as I was trying persuade him that he didn't want my scarf,  he leaped off the couch to prance around the living room, dragging it behind him.

I carefully corralled him (no dogs were permanently injured in this procedure...but he could have been!) and unstuck the scarf from his bone.

Pause for the air turning blue from my cursing as I discovered that several rows had their yarn broken in one area.  Huge hole that I darned together.

So that's the whole story.  Nancy Bush's beautifully patterned scarf has turned into something I will wear VERY carefully as Alex bushwhacked my satisfaction in a job well done by reminding me that nothing is more important that quality puppy time.

That's my story and I'm sticking to it!

Sunday, February 12, 2012

The Long And The Short Of It

This weekend has interesting around here at Alice's House.  The long of it started with the completion of a project that took me approximately two years, ten months and three days to complete while the short of it took about thirty minutes.


Let me explain. 


First, the long of it...


Back in early April 2009, I visited the Knit Picks site and came across a posting for a knit-a-long for the Classic Lines Cardigan.  A nice simple cardigan with a couple of advanced techniques just to make it interesting.  (Photo from Knit Picks).  


Classic Lines Cardigan Pattern

I read a couple of posts on how the arms and body were a little skimpy so I added a couple of inches to my basic measurements in order to pick a size.  Glad that I added the extra inches as the final product is anything but skimpy.  In fact it looks rather over-sized to me which is bonus to me.  So rather than looking/fitting like this: (Photo from Kelly at Knit Picks)


Mine looks like this:

Despite the crappy picture you can see mine is very loose, much  longer and my neckline looks more like the one in the pattern.  Here's a better photo that does show off the wonderful yarn - 


The subtle stripe is obtained by using two strands of Shadow for every row and an additional strand of Shimmer every few rows.  The more solid color is Forest Heather Shadow while the stripe is Bayou Shimmer.

I did learn some lessons with this project.  One is that I can do anything I put my mind to but that doesn't mean I can do it well.  The steek wasn't so bad but I discovered that my row counting for the front bands  left a lot to be desired.  (Hey Al, six rows are not the same as nine rows!!!)  The other thing I learned was that every knitting pattern designer has their own ideas when it comes to sizing.  It would have been helpful if the chest measurement given was for the wearers' chest or the garments' chest, as an example  Of course, if I had read the blocking diagram I would have realized that the sizing was based on the garment and not the body that would wear it.  Lesson learned again....read and follow the instructions.

I am cuddled up in my extra extra large sweater today as it was just above freezing this morning when I walked the dogs and I am still feeling a bit of a chill.  I will probably not do this pattern again but if i do I will not almost three years to complete it!

The short of it you ask?

I got my hair cut the other day and lost about ten inches of length.  It is really short but I think it will work for me.

Here's the back:

And I think you can get a concept of the front from this crappy shot:


I love wash and go hair !

So that's it... the long and the short of it..literally.

Have a great week...and stay warm!


Sunday, January 15, 2012

Charity Knitting

Yesterday I took the opportunity to join other members of the Knit at Night Guild (KANG) in a charity knitting event at Central Market.  Central Market is one of those fancy grocery stores where, instead of Saturday tastings being some frozen concoction, they sample home made marshmallows.  They have a wonderful meeting room on their second floor, next to their cooking school, and about thirty of us met on Saturday for some knitting for charity.


This group is one of the classiest craft guilds I have ever belonged to....and I think I have been a member of about 99% of them at one time or another.  Everything you could possibly need to be successful at the chosen projects was provided including wonderful food (catered by the store) and endless, excellent coffee.


Two projects were presented.  One is a blanket buddy from Lion Brand Yarns and the other was a selection of facecloths.


Each participant received a kit that included the pattern(s) for their chosen project(s), sufficient yarn to complete one or more of the project and knitting needles to make the project.  The needles were a thank you gift and are high quality bamboo ones.  There were fabulous door prizes including a book (with supplies) for knitting with wire.  I did not win anything but those that did were very pleased.  (Check out this site for great prices on quality needles.) 


I chose the blanket buddy project which is basically a knitted square with a bunny head and arms.  The instructions required a little interpretation and mine came out like this:


Pretty cute, yes?


All the yarn was donated and I received two skeins of DK weight yarn called Jamie.  You use this yarn doubled for the blanket buddy so this toy really has some heft to it. I think I may have enough left over to make another one. So far Alex has not realized that there is a new toy in the house and I hope I am successful in keeping it from him until I can hand it in.


Most of the items made will be donated to Texas Children's Hospital and other local charities.


I must admit I thought this would be a pretty lame gathering and, except for the one woman who kept telling medical horror stories, the group was very congenial and everyone seemed to be having a very productive time.  I left with about a half hour's of work left and some people actually completed their project.  


The facecloth folks were given patterns that could be a stretch for some people as each used interesting and slightly complex stitch patterns.   Check them out -  Lizard Ridge, Darrell Waltrip and Dimpled were all presented.  I am glad I chose the blanket buddy as I was not in the mood to struggle with a new stitch pattern however I really want to try the Lizard Ridge one as it produces such a great result. 


I hope they will do this again and they are looking for a more central location for the next one.  I wonder if I can convince them that Kingwood is a more central location as I know I could get the Elmgrove Community Room for such a great project. 

Tuesday, January 3, 2012

Gift Copies

Have you ever received a gift that you liked so much you wanted more of it?  


That seems a no brainer if the gift was chocolate.  Who wouldn't want more chocolate?  You can always buy more chocolate as it tends to be within everyone's price range.


But what about a gift that is not consumable?  Diamonds are a great example.  I always like diamonds but probably can't afford many more.  


Some gifts you want more of but not an exact duplicate as what you have already received.  Like a red jacket you would love a duplicate of but in a more conservative brown.


That was my dilemma when a friend gave me an adorable little knitting bag.  Its made out of silk, has an outside and an inside pocket, a great yo-yo embellishment and it is just the right size for a sock knitting project.


See...


Isn't it cute?


I love it BUT there a couple of things that are could be better.  For one thing, the interior fabric is a flimsy, black fabric which means it's probably not very durable and it is very difficult to see any bits at the bottom of the bag.  Dark interiors are not good things.  In addition, I didn't like the button closure which was a little wooden ball.  Since it is right above the pocket embellishment I would have loved a more colorful button.


What's a girl to do?


Put up with the defects? (too irritating)


Remake the parts that are bothersome? (too much effort)


Hide it in a drawer never to see the light of day again? (but it is a great size)


Well this girl decided to make her own copy.


I have made two cousins of the original.


The first copy used simple geometry to produce a copy.


Here's how it turned out:


(LOVE THAT FABRIC!)


Boring details:  the fabric is a Michael Miller fabric called called Flora and Fauna Blossoms in raspberry.  The orange button is from the stash.  The interior fabric is the same as the exterior and the interior pocket has an orange zipper closure.  


When compared to the original though there is something our of whack.  
(sorry about the poor color correction)


After remeasuring everything I realized that I had got the length of the straps wrong.  The originals are 22" long while the copy has them at 12" long.  The big problem is that the pointy bottom part is not a ninety degree angle but more like one hundred and ten degrees.  In addition, the pocket turned out too short due to that miscalculation.  The original is more like a fat Buddha like bag while my copy is more like a skinny Fifties like bag. 


Here is my second try:


Boring details:  the fabric is a washed dupioni silk from the stash and backed with a lightweight fusible interfacing.The pocket embellishment is part of an old thread painting class.  The 'button' is an old Chinese coin, some wooden beads and a strip of the silk fabric.  The interior is a striped cotton from the stash and the interior pocket has a cream zipper.  Wanda McKnight (the hat stand) likes this copy the best as she is pretty conservative.  Almost forgot...I added some lavender buds between the exterior and interior so it smells as good as it looks. 


Now I have three new knitting bags - one the original gift, one a skinny replica and the third an orange silk Buddha bag.


If you would like copies of the patterns I created for these bags, please let me know and I'll scan them into a file for you or we can hook up and I can give you a hard copy.


Now I need to get back to my knitting so Paul can get this year's Christmas present this year:-)   

Tuesday, December 27, 2011

Just in Time...

for the frosty mornings that are coming our way.


Yes, there are not that many when you live in Houston but there are enough that you do need some warm things to wear when walking the dogs in the morning.


My idea this year was to just stack on all the little scarves and shawls I have made lately under my quilted barn coat.   Not especially attractive but I figured it would do the trick.


Then I saw this scarf that the mighty Janetta made for her daughter in Texas A & M colors.  Then she started one in a cream, pink and lime green variegated sock yarn and I was hooked. 


The pattern is on Ravelry by a Canadian designer, Jane Richmond and is extremely inexpensive to buy.


I, on the other hand, did not buy the pattern, just read Janetta's copy, and proceeded to make a successful Rae Scarf.


Here is it wrapped around a youngish live oak in the backyard:


And here it is draped across the fence:


It came out to approximately 50" long and 12" wide at the widest point.  It's made out of Knit Picks Stroll Yarn in the color Summer Blooms Tonal.  This yarn is great to work with, extra long yardage for the weight and washes and drys up beautifully in the machines.  I had one problem with the yarn. About two thirds of the way through the scarf there was a knotted join in the yarn.  Normally that would not be a problem but at some point when I was weaving in ends I undid the knot and the scarf started to unravel!.  I tied it all back together with many, many knots  and many, many  curses.  Unless you are looking for the error, you would not find it.


Bring on the cold weather, I'm ready for you...even if the dogs are not.

Friday, November 25, 2011

Blue Jean Shawl

In my quest for accurately counting stitches while knitting lace I picked a very simple pattern from Tanis Fiber Arts called the 'Prism Shawl' for my next lace adventure.  It is available from Ravelry for free here.  It uses about 600 yards of sock weight yarn , hand dyed from the Araucanuia Yarns' Ranco Solid line and i happened to have a lot of it in aownderful blue to go with my blue jeans.. 


What attracted me to this pattern was its simplicity of construction until you get to the border.  With just stockinette, garter and eyelet rows randomly scattered through out the design this is a pattern I thought that even I could not mess up.


And, surprise, surprise I did not mess up the body too often.  Every once in a while  found I had dropped a stitch or not added a stitch when required but due to the lack of complexity I was able to fix these errors quickly and invisibly.


Then I got to the border.  About two rows into the border I accidentally pulled off about 30 stitches and realized that I would need to unravel a few rows to get back on track.  Off came a couple a couple of rows, on went the stitches back onto the needles..with an extra twenty on one side!


I don;t know how I did it but I ended up with more stitches on a row than I had originally.  Instead of more un-stitching I decided to go with what I had and make it work.


Here is how it came out:


What you don't see is that the center back point of the shawl has a large ruffle..which sits just above my tail bone!


Someone told me it is fashionable to have ruffles this year.


I may have messed up the final border but this is a great pattern for using up odds and ends of sock yarn.  Since I have a few hundred (thousand?) yards of leftover sock yarn, I think I will be using this pattern again for a more eclectic version.


PS - Guess who I found wondering around the house with this shawl in his mouth looking for a place to hide it?   

Tuesday, October 11, 2011

Red Scarf Project 2011

The Red Scarf Project is off and running for 2011 and I have actually completed one already.


What?


You don't know about the Red Scarf Project?


Begun by Foster Care to Success (formerly the Orphan Foundation of America) in 2005 when they collected 3,500 scarves to send to their clients on Valentine's Day.  The next year they collected and distributed 15,000!  The project keeps growing but so does the need.


I cannot imagine being 18 years old, with no family, being literally dropped on the street by your foster family and having to fend for yourself.


I cannot imagine trying to finish high school, find a home, shop for your own food and make all those life changing decisions that young adults make without any support from an adult.


I cannot imagine being a friend of a Knit at Night Guild member who was dropped form the program in the middle of their senior year  of high school who spent those critical last months of high school sleeping on friends' couches.  The KANG member related that this friend of hers received one of the Red Scarf Project scarves and how much it meant to him that someone he did not know would make something for him and send a word of encouragement.


I may not be able to imagine all these things but I can make a scarf, send a word of encouragement to some kid in these circumstances.


My first scarf, of what I hope will be several this year, is a simple 2 X 2 rib made from Knit Picks sport weight Stroll yarn in Holly Berry.  Here's how it turned out:


I used two skeins for the body of the scarf and some of a third ball for the fringe.  Excluding the fringe it is about five feet long.  The yarn was easy to work with but I was a little disappointed that there were so many joins in each skein.  There were at least eight in one of the balls and another 6 in the second ball.  In general, that should not be a problem but each join is a potential weak spot and I do worry that repeated washing could make for an unexpected unraveling... or maybe not.


Grab your knitting needles or crochet hooks, review that guidelines and make a scarf.  Heck, you might even learn a new stitch pattern or opt for the tried and true like I did.  In either case you could make a real difference in the life of someone you don't even know and what could be better than that?

Thursday, September 29, 2011

Calais Shawl

In my unending desire to knit a piece of lace without five thousand miss-counts or dropped stitches, I searched on Ravelry for a free simple lace pattern...that is, one with very few pattern stitches and lots of simple repeats.  There are hundreds of free patterns that are easy but that is because most of them mostly straight knitting with a complex hem.  The Calais Scarf by Judy Marples of Purl Bumps fit the bill.  Here's the photo from her pattern: 


Isn't it lovely?  Many repeats of a small number of stitches (for those of us who can't count) plus an interesting border.  These attributes when combined with the use of only one skein of yarn made this a great project for me.


Off I went to the stash thinking of all those sock yarns I have acquired and how lovely they would look in this pattern.  While sorting through the pile I came across a skein that I actually hate and realized that it would work for this pattern.


I had purchased a skein of Araucania's Lonco Solid mercerized cotton yarn that had been hand dyed in chocolate brown.  I wear a lot of brown in the winter and thought that brown socks would be a logical choice for me HOWEVER this yarn has no stretch in it and would make lousy socks...or at least socks that would not stay up.  I had ignored good advice about always reading the label before you buy a yarn and had ended up with string for sock knitting.  YUCK!


Anyway, I have been hiding this yarn in the bottom of my basket and brought it out for this experiment in lace knitting.


Here's how my effort came out...


Yes, you can see a couple of boo boos and yes, on one row I couldn't figure out if I was knitting or purling but it's done, is incredibly soft and drapes beautifully.  This is definitely something I will wear as a decoration rather than for warmth and I love it.


Lessons learned/re-learned:

  • stitch markers are your friends
  • count twice, rip once
  • blocking wires are a good thing but finicky to use
  • nothing I own is big enough for blocking this type of project
  • there is no bad yarn, just yarn that hasn't met the right project yet

I think I will try this specific pattern again but in a traditional yarn (like a wool blend) rather than the string I used this time.


Time to go stash diving! 

Tuesday, August 30, 2011

Fat Socks

Way back when I was a lot younger and more athletic I would go skiing with my family.  One of the best things about skiing was that afterwards I could take my ski boots off and put my poor tired feet into something big and sloppy.  Apres ski boots were never in my wardrobe but over sized socks worked for me.


Flash forward more years than I care to count, and I now live in Houston which is many hours of hard driving from any ski slopes.  The only thing that remains is that in the winter my feet get cold and tired and that walking on cold tile floors does not make them feel any better. 


House slippers are okay but want I really want are over sized, sloppy wool socks.  Try to find ill fitting scratchy socks in the stores and they will ship you off to the funny farm.


Enter the Twisted Yarns sale bins.  A couple of months ago I spotted two large balls of something called Classic Worsted Tapestry yarn from Universal Yarns.  The color I found was China Blue which is wonderful mix of blues, creams and golden yellow.  With my imagination running wild, I bought two balls and decided to make bulky socks using one ball per foot.


After a few weeks this is how they came out:


Yes, they are big over sized wool socks but they look pretty awful with that lazy squared off toe.


Light bulb moment...why not felt them? They would still be bulky wool socks but maybe they would look a little better.


Into the washing machine and dryer they went and this is how they came out:


Not very different from the before picture!


What was going on here....


It turns out that your intrepid knitter had not read the label on the skeins of yarn.  Classic Worsted Tapestry is not a 100% wool yarn.  I had imagined that.  It is really a 75% acrylic yarn with 25% wool thrown into make you think it is really wool..BUT IT IS NOT! 


I still love my socks and their over sized scratchiness but I have learned a big lesson here:


READ THE LABEL... not just the name of the yarn BUT THE WHOLE LABEL!  Read it once when buying the yarn, again when you get it home and again when you are considering what to do with it.


Then you might not be in the position I will be in when I show them at the knitting guild meetings this month where I will have to confess that I cannot read and that yarn with any acrylic in it will not felt.


I think I am now ready for winter...sloppy house socks, small shawls/scarves and ear warmers.  If I get down to really knitting I will even finish the sweater I started two years ago for the complete homemade look.


OR maybe I should try mittens before I finish that sweater?