Sunday, July 24, 2011

Lace #1

A couple of months ago I was admiring a lacy shawl knit by a friend.  It was white, slightly fluffy and thoroughly delicious looking.  I came home and looked up lace knitting on Ravelry and saw many beautiful examples of lacy shawls and thought I could make that!


As in all new projects, my enthusiasm was a tad more than my skill or ability but charge ahead I did.


First I needed to select a yarn.  I had a skein of fingering weight yarn from Schaefer Yarn in the Aung San Sui Kyi color... a luscious colorway of peach, green and blue in 50% merino wool and 50% silk called Audrey.  I had intended this yarn for some special socks but a lacy shawl seemed like a better project for this yarn.


Secondly I needed to find a pattern.  Since I had 700 yards of Audrey I figured I would have a lot of choices.  WRONG!  It seemed that most of what I liked either required thousands of yards for a body covering shawl or only about 400 yards for a little neck cover.  I needed something in between and ended up selecting a free pattern on Ravelry called Ethereal Shawl and originally published on the Patterns From my Head blog.  There were options included in the pattern for using more or less yarn than the original.  The best part about this pattern is that it has been tested and the pattern updated several times so any errors/discrepancies in the original pattern have been solved.


I printed off a couple of copies of the pattern, sat down with my needles and cast on assuming I would be finished in a couple of days.  Almost a week later I was still casting as I ripped out the first few rows about 20 times before I got into the rythym of the pattern.  As I continued to knit I found that I had a lot of trouble counting my pattern stitches, keeping my place in the pattern and at about 75% complete I found that I had dropped a sticth or two way down int he middle of the pattern.


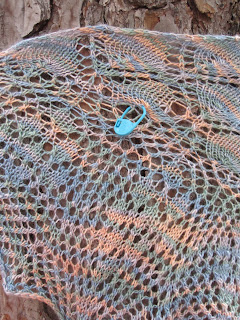
Here's how it turned out:


Here's where I dropped a stitch or two.  Still don't know how I going to fix it but I will...even if it means just threading the loose stitches on a piece of yarn and tying it off in a big honking knot!
I am not unhappy with the result as it fits around my shoulders and is light enough to not be oppressive but heavy enough to provide some protection against air conditioning.


There are a lot of lessons learned in this project.

  • Have lots and lots of stitch markers when doing doing multiple repeats of the same pattern in a row.  I used over 20 per row by the end, and although it looked like it was raining stitch markers every time I stood up, they made a huge difference in keeping track of the pattern.  I did not learn this until about 30 rows from the end.
  • Count every pattern repeat and every row at least twice.  Just because you got the right answer on the first count, count again just to be sure.
  • A variegated yarn like I used is beautiful and hides flaws but a solid yarn would have highlighted the pattern better.
  • Stitch markers are not all alike.  Those made out of rings with a little space for opening them up love to catch extra yarn especially when using such fine yarn.  Look for stitch markers when the ring does not have a little gap in the ring.  This is not a good marker...see the little gap in the ring?  While these and these look great.  Most of my stitch markers have the split so i was not a happen camper.
  • Make many copies of the pattern you are using.  I ended up destroying three copies with my notes and marks.  I still have one copy in pristine condition so I can always try this again. 
  • Use the recommended size of needles.  Do not assume you know better, you probably don't.
Well, that's it for my adventure in lace knitting.  I may try it again as I have found several more lace patterns in my books that look beautiful and, if I remember my lessons learned, could definitely be done by the colder weather. 
  

Sunday, July 17, 2011

Helical Knitting

In my continuing quest of being a know-it-all, when it comes to everything, I took a class yesterday with the Knit At Night Guild (KANG) on helical knitting with Kenny Chua at Park Avenue Yarns in League City.

First off I was late in arriving.  I misread my GPS and would have ended up in Galveston Bay if I had continued on the right road for way too long.  The shop looked wonderful but the parking for such a large class (about 20 of us) was inadequate.  I ended up parking in a puddle on the side of the road and did a very graceful leap out of the car.  

Yes, we had some rain (Yeah!) so puddles were to be expected.  My inexperience with this phenomenon meant I wasn't watching where I parked.  Lesson re-learned!

Kenny is a young chemical engineer by day and a wonderful knitter by night.  He has had patterns published in several mass media magazines like  Knit Simple, Knitter's Magazine and Interweave Knits.  He is a good teacher but seemed uncomfortable up there when, I think, almost everyone in the room was older than him.  I hope he keeps at it as he is very knowledgeable with a delightful sense of humor.

Helical Knitting is a response to those of us who knit striped garments and accessories in the round.  Instead of knitting back and forth on two needles, knitting in the round means you are always knitting in one direction, usually on needles joined with a cord.  

Knitting traditionally (back and forth on two needles) does not have a problem with stripes.  You want to join colors, wait until the end of the row, tie on a new color, cut off the old color and continue knitting.

Knitting in the round does not give an opportunity for a hard stop as the end of the row never happens until the end of the item.  Striped items usually end up with a jog in the stripes, setting you up for an unattractive indication of where you changed colors.

Helical knitting is a response to that difficulty.  Essentially you knit the different colors so it looks like you are knitting in a spiral.  Since you are only knitting a single row of color per stripe the colors spiral up the item being knitted without a bunch of joins and without the slope implied by knitting in a spiral.

It really is a very clever way to knit a striped item and I encourage you to check out Kenny's website for some beautiful examples of helical knitting.

Here is my output from the class:

The only place where you can see a join is just where you join the colors to the base brim.  Here its the addition of the yellow to the rust at the top of picture.

Otherwise the changes in the colors is completely invisible.

We were using Berroco Comfort worsted weight yarn in four colors.  Although I am not in love with this yarn, it really is relatively easy to work with and is completely machine washable and dryable.

How do you accomplish this miracle of knitting stripes without a join?  Here is a website with some very technical instructions and another site with a different approach.

If you just want to dive in and give it try here are a couple of things to think about:
  • Number of colors - not more than six, 
  • Number of stitches - the more the merrier.  We worked on a 105 stitches to a row hat.
  • Stripes cannot be taller than one row for it all to work.
Here is a basic explanation on how to do it:
  1. Start with a base - in this case we used a 1 x 1 rib on needles two sizes smaller than the needles used for the body of the hat.  We used 98 stitches for the ribbing on US size 6 needles.       
  2. Optional - increase the ribbing stitches from 98 to 105 in a plain stockinette knit row.
  3. Divide the number of stitches in a row into four equal amounts if you are using four colors.  In our case we divided the 105 stitches into three sections of 26 stitches and one of 27 stitches.
  4. With the same yarn as the ribbing,on the larger size needles (we used US size 8), knit 26 stitches, drop the yarn (DO NOT CUT) and pick up your next color.  Knit 26 more stitches drop it and pick up the next color.  Knit 26 stitches, drop it, pick up the last color and knit 27 stitches.
  5. Knit 26 more stitches with your last color, drop it and pick up you ribbing color yarn when you reach where it is hanging.  Keep dropping and picking up yarn colors as they appear.  One part of each row will be twice as long in one color as the other two parts but just go with it.  And yes, your yarns get tangled but deal with it however you want.
  6. Admire the magic!!
There was a bonus in this class in that we learned a brand new cast-on called a tubular cast on.  I did it completely and utterly wrong.  I am going to You Tube and my reference books to try it again as it really made a lovely edge to the ribbing.

I still don't know it all but I will continue my quest.  After all , my ex once said i was right about things 95% of the time so I just have 5% of everything else to figure out.

Have a good week!

Friday, July 8, 2011

Walker Bag Instructions

Last week I talked on the latest Women on a Mission project.  Today we tried to figure out the best way to get the walker bags efficiently put together.  These are a little more complex than the wheel chair bags that we have made in the past but the results are pretty spectacular.


Here's what we figured out.


Take note - these bags are best for the aluminum frame type walkers rather than the ones with brakes and seats.


Staffing needed:  One person serging, two sewing, one ironing/running/trimming/organizing.


Seam allowance - between 1/4" to 1/2"


Fabric cuts needed - four pieces 4" x 12" for the straps, three upholstery weight or five quilting cotton weight cut 16" x 14" for the body (and lining) and an exterior pocket, two pieces of 6" of Velcro (optional)


Handles (four 4" x 12" cuts of fabric) - Fold and press the handle fabric, wrong sides together, lengthwise then fold the long raw edges into the center of the handle and press again.  Top stitch the open edge closed and the folded edge as well.


handle


sew handle
(images from Sewing 4 Dummies)  
Trim and set aside.


Note: the Velcro, if wanted, should be attached after the bag is constructed as we have found this is the best way to make sure that pieces line up correctly.  If you don't use Velcro then the handles can tied to attach the bag to the walker.


Pocket (one 16" x 14" piece of fabric):  


Wrong sides together, along the long (16") side, sew or serge a seam creating a tube.  Turn right side out and press so that the seam you just made runs along the middle of the pocket and not on an edge.  


Top stitch one long side as the top of the pocket.  


Top stitch the other long side to one of the exterior pieces two inches from the bottom edge. 


Perpendicular to the top stitched seam you just sewed, sew one or more seams subdividing the long pocket into two or more smaller pockets.  Back stitch these seams securely at the top and bottom of the pocket.


Putting it all together


Upholstery Weight Fabric


Place the pocketed piece of fabric right sides together with the remaining piece of exterior fabric.  Serge along the sides and bottom of the bag.  Make sure you catch all the layers!


To make a 'bagged bottom' line up the side seam and bottom seam together making a pointed corner.  Serge off this tip making a four inch long seam.  Use the bottom of the pocket to estimate where to sew.  Here is a nice tutorial on how to do this.


Serge around the top of the bag making a nice clean finish.  Remember that you will be sewing only one layer of fabric!!!


Top stitch all of the serged seams, except the top.  You may be sewing through very heavy fabric so do the best you can.  The purpose here is to reinforce the serged seams and to making a nicer finish on the the interior.  Try to also sew down the serged seam in the corners as well.


Fold the top, serged edge about one inch into the interior of the bag, pin the handles, two to each side about three inches in from the nicely serged and top stitched sides.  Top stitch around the bag at least twice, once at 1/4" and again at 3/4" in from the folded top edge being sure to catch the handles both times.


Sew Velcro onto the handles (if wanted) being sure that the handles don't twist when the Velcro is pressed together.


Trim, trim and trim again.  There will a lot of thread ends no matter how careful you are so trim, trim and trim again.


Quilting Cotton Weight Fabric


I wrote a reversible tote bag set of instructions a couple of years ago and the construction of the walker bag using quilting cottons is a very similar construction method.  You can find the full instructions here.


Layer your 16" x 14" fabrics n this order:


one interior fabric face up
one interior fabric face down,
exterior fabric with the pocket face up,
exterior fabric without the pocket face down.


Serge along the sides and bottom making sure you capture all the layers.


Bag the bottom aiming for a four inch long seam.  Use the bottom edge of the pocket as a guide.  See the reversible tote bag instructions for a good picture.


Turn the bag right sides out and press well.


Press the interior and exterior fabrics about one inch into the space between the fabrics.  See the reversible tote instructions if this doesn't make sense to you.


Insert the handles, two to each side, about three inches from the side seams and pin in place. Top stitch around the bag at least twice, once at 1/4" and again at 3/4" in from the folded top edge being sure to catch the handles both times.


Top stitch the side seams, the bottom seam and bagged corners as best as you can to reinforce the serged seams.


Sew Velcro onto the handles (if wanted) being sure that the handles don't twist when the Velcro is pressed together.  

Trim and trim again although there will not be as many thread ends to finish off as the upholstery weight fabric bags it pays to check carefully just in case.


DONE!


What?  No pictures?  I sent all the fabric kits and practice bags home with the beautiful Rose but I will try to get some pictures the next time.


Want to do something simpler?  Here are the instructions for the wheel chair bags we have been making for a couple of years now. 

Thursday, July 7, 2011

Flamenco!

The knitting yarn not the sexy Spanish dance.

There is a whole new class of novelty knitting yarns out there that look like rope or fat ribbon, or, in this case, netting that knit up into fluffy scarves and can add interest to otherwise plain sweaters or other knitting projects.

I was in Twisted Yarns the other evening before a KNOT (Knitters' North Of Town) meeting and saw one that looked like a fishermen's net called Flamenco by Trendsetter Yarns.  Here is a link to  Jimmy Beans' selection which seems to be the broadest I have seen.

I picked up a skein of plain white, knitted it up at five stitches to the row on 6mm (US 10) needles into every other loop and ended  up with 10 feet of fluffy scarf.

Pretty neat, eh?

A couple of cautions about using this type of yarn.  It is really tedious to knit.  If you are used to just barreling along through one stitch after another you will hate knitting this yarn.  For every stitch you need to open up the weave, find the edge loops and knit into the one you find at the right distance from the previous used loop.  Then you do it all again...and again..and again.  Another thing to be aware of is that it is 100% acrylic so it may be sweaty to wear. 

On the other hand, knitting with this yarn gives you instant gratification.  At the end of each row I fluffed out the weave and was instantly pleased by the pretty ruffles formed by the knitted yarn.  I intend to wear it as a scarf but I think it would look great great as a trim on a sewn garment where that kind of girly embellishment would work.  Then again, wouldn't it look great on a denim vest or jacket?  Or how about hand sewing it into a ruffly flower?  I'm sure you get the idea and can come up with some of your own.

My skein came with a knotted join a couple of yards from the end of the skein.  I knew I did not want that kind of join in the scarf and was too lazy to hand sew the ends together, so I have set it aside and intend to dye it.  In fact, I have some in the dye pot right now and hope to have it set in the next couple of hours.

Try Flamenco or any other of these new yarns for a quick knit and a fun addition to your knitting repertoire.  Other names/types are Flounce, Triana, and Cha Cha.  There are a host of videos in You Tube about how to work with these yarns.  Needles to say, I did not watch any of them before I started and I still got a great result.  

What else is on my needles right now?  My albatross is a sweater I started two years ago now and am still not more than half way done, a pair of extra chunky wool socks for keeping my feet warm in the winter on cold tile floors and my very first real lace project.  

Yup, I have decided to try to knit a lacy shawl thingy.  So far I have had to un-knit about every other row and it took me about a dozen tries just to get the darn thing through the first ten rows without messing up too badly.  It is called the Ethereal Shawl from Patterns in My Head and mine should look something like this when it is done, except mine is made from a varigated yarn with peach, blue and green sections:
 Wish me luck... only about forty rows to go! 

Sunday, July 3, 2011

Pretty Little Purses and Pouches

The other day I stopped at Tea Time Quilting looking for some funky prints (their specialty) and found a copy of 'pretty little purses & pouches' on sale.  Lark Books has published about a dozen of books in this series and have come up with a winner on this one as it has a lot of interesting ideas for purses and pouches.   


I decided to try out one of the designs and I immediately fell in love with the organization of the book.  There is a comprehensive, but not expensive, list of tools.  Basic construction techniques are gathered together at the front of the book.  The patterns are tiny but are easily blown up at your local copy center to fit a standard sheet of paper... a really good thing!  And finally there were no errata to plow through which happens a lot in this type of publishing.  I think someone independently tested the patterns so that major problems were eliminated.


Here is the pattern I tried:


I haven't set snaps in a few years but thought that I would remember the major steps.  Needless to say, I spoiled many snaps and a lot of scrap fabric discovering that snaps weren't about to happen.  I ended up using Velcro and a couple of odd buttons for the closures.  


Here is my interpretation of the snap attack purse:


I used some old silk dupioni for both the exterior and lining and a couple of odd buttons to cover the thread used to attach the Velcro.


This is a clever design with two little compartments that seem perfectly sized for a cell phone and  small wallet.  Micha Mae Melancon (blog and Etsy shop), the designer, has created a wonderful project that could be size up or down depending on your needs.


Now I'll have to try some other projects in the book like this:


or this:


or maybe this:


Or maybe I will stop avoiding what needs to be done around here and find out what my little pee machine (aka Alex) has been doing all afternoon.