Showing posts with label quilts. Show all posts

Saturday, July 6, 2013

Longhorns on the Bed

A couple of years ago I participated in the first Quilt Shop Hop Across Texas.  I made it to about ten shops and thoroughly enjoyed myself in seeing parts of Texas that I hadn't seen before.  During that two day drive I picked up a couple of kits with Texas Longhorn themes.  One I put together and hated.  Fortunately it was very small and when I knew I was hating it, I chucked it in the garbage.

Fast Forward to this past November.  While packing for the quilting cruise I took I threw in a partially finished kit that I had started at the KAQG quilting retreat in September and finished most of the piecing on the cruise.  I was feeling pretty good about piecing something that had only aged a couple of years. It took until a couple of months ago for me to get it ready for quilting and (FINALLY), last week I got it quilted.  During the recent Walking Dead marathon I completed the binding.

For once, I am completely happy with the way a quilt turned out.  (Crappy picture below)


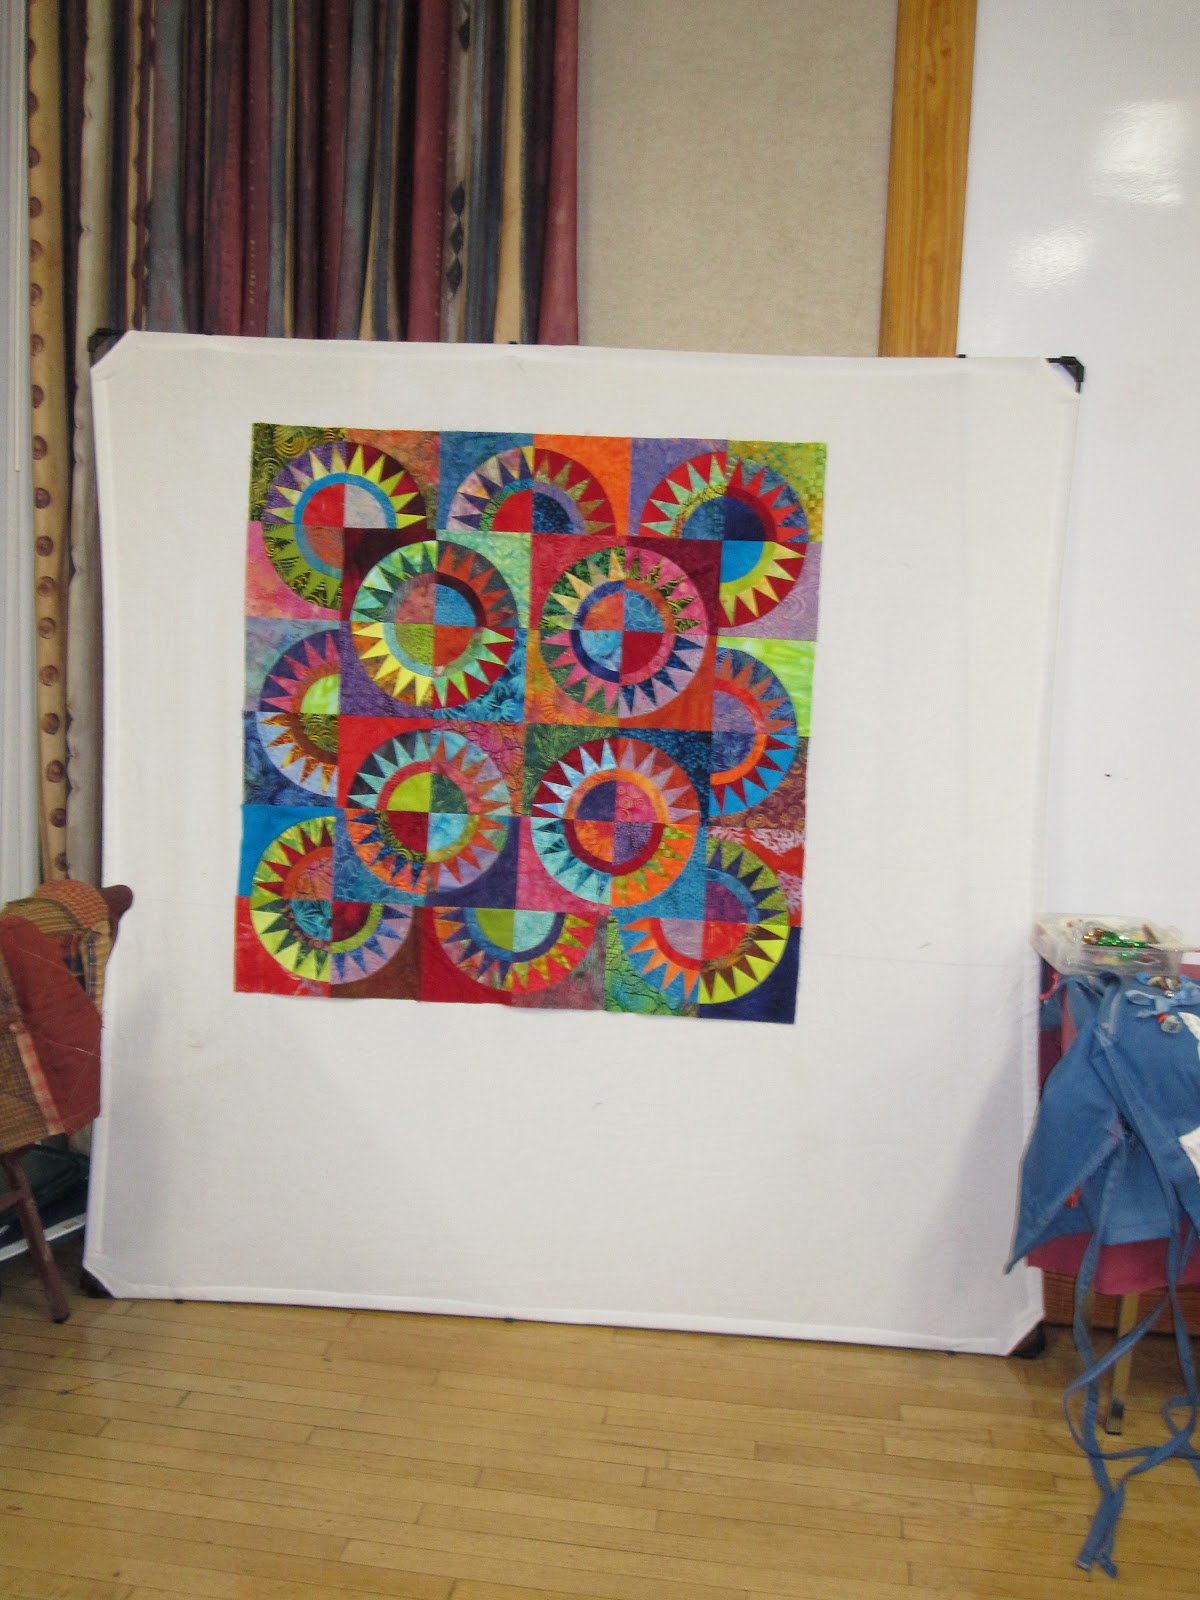
The original pattern was based on a Thimbleberries design called Christmas Tree farm which does not seem to be on the web.  The basic concept was to use related fabrics including one large print (the Longhorn center panel) as the focus to create a very simple quilt with a lot of pizazz. My version turned out to be about 50" x 70" which, from past experience, is the perfect size for one human and a Doxie or three to use for a cozy winter's  nap.

Lessons learned ... actually there is only one lesson I learned with this quilt.  The lesson is that for every quilt it is good idea to cut your final border fabric an inch or so wider than the final measurement.  This allows you to square up the quilt without losing any of the final width so that the proportions remain the same as what you had planned.  I must remember this because even long arm quilters appreciate that little extra wiggle room if needed.

Now back to The Walking Dead! 

Monday, June 10, 2013

Coffee Breeze

I just finished another top from the Saturday Strippers group.  I think it is the first time I have actually finished the project, in the stated size, before a new project starts.  The project is from this book and is called Summer Breeze by Kim Brackett.  Except for one quilt, all of the projects in her books are easy to put together and are designed to use just one Jelly Roll and some background fabric.  Kim is great designer and writes great instructions.

( a Jelly roll is a collection of 21/2" by Width Of Fabric (WOF) strips of coordinating fabric sold by the manufacturer to quilt stores for fabric junkies like myself)

Here is my rendition of Summer Breeze:

The fabric I used was from a Jelly Roll by Timeless Treasures' Tonga batiks called something like Coffee Break.  The background fabric is a fake batik of gold, beige and pink.  I think it went together well, and, since my colors were not summery, I have called my quilt top Coffee Breeze.

I did make one adjustment to the pattern in that I used only one border and not two as shown in the pattern.  The reason for this is that I did not cut my fabrics efficiently and ended up with a lot of little bits that would have been a pain to piece for a border...so I didn't.

I love the top....about 60" by 44"...and I learned a lot about my piecing style during this process.  I noticed during our session that each person has a very distinct style for putting a quilt together when there is a clear plan from the designer. 

Some people cut out all the fabric required then piece each little bit separately.  For instance, in this quilt that meant making all the pinwheels first, then bordering each pinwheel, then making the striped blocks then sewing the pinwheel blocks to the striped blocks.  Then assembling each row then sewing each row together then adding the borders.  All of this activity is interspersed with many stops to iron their work and square up any anomalies.

My style is cut out some of the fabric, make a few blocks (usually about four), putting those four together, admiring my progress then repeating that until I have it ready for borders.  I finger press only when I need to and squaring up only occurs by ripping out the errant stitches and resewing.

I'm not sure which is the more effcient method but there is no difference in the outcome.

Kelis approves of my efforts and I can't ask for much more than that.


Saturday, February 9, 2013

The Most Expensive Quilt Ever

Just after the Houston International Quilt Festival in early November Martha and I went on a quilting cruise to the western Caribbean.  A quilting cruise usually entails an up charge on your cabin rate to cover the cruising expenses of several quilting teachers, the use of cruise organizers sewing machines, the use of the conference center for classes and sewing and lots of little extras like an opening cocktail party and lots of door prizes.  Our cruise included only one teacher, Deb Tucker and only one quilt.  This suited me just fine as I didn't want to end up with a bunch of small quilts, I did want to learn a new technique or two, I did want to work on a couple of UFO's and I did want to get in some serious sun bathing.

This is the quilt we worked on for the majority of our cruise:


It is about 42" square and it will reside on one of my walls once I get a curtain rod set up for it.

The special technique taught was the use of Deb Tucker's special ruler for the stars and another ruler for the little squares and triangles in the border.  Basically the technique is to create oversize blocks that are trimmed down to the right size.  The rulers really did help but it was very time consuming.

Why is this the world's most expensive quilt ever?   Along with base cabin charges at ~$1,300.00 I also was charged about ~$500.00 for the teacher and other extras and charged about ~$65.00 for the quilt kit.  I got one UFO top ~90% finished and one ~50% finished as well.  We did spend most one day playing with Bernina sewing machine accessories woth a great little kit included.

I figure this quilt, which is too small to snuggle up in, cost over $2,000.00.

Any every penny was well spent.

And I would even do it again.

And I even got to spend a few hours sun bathing.

While the Northeast gets hammered by a huge blizzard I hope this remembrance of my cruise will warm you up a little.

Tuesday, June 12, 2012

When Life Gives You Lemons....

In this case, I could not find a suitable border fabric for my latest 1600" quilt.  In case you have forgotten, a couple of weeks ago I posted about the 1600'" Quilt I had created during a session of Saturday Strippers.  Here is the link if you have forgotten.

My problem was that I wanted a patterned fabric for a border and couldn't seem to find one that would work.  Of the three solutions I suggested then, I finally decided to go ahead and try to make my own fabric.

With that in mind I cut samples of three different black fabrics I had in the house and applied a little sprayed bleach to each of them.  Friends convinced me that one of them looked pretty good and I went off to make more.

I laid out the black fabric on the driveway and laid old clothesline, a dog tie out and some pine needles on it.  I then sprayed it with a 50% solution of bleach and water.


One hour later this is what it looked like.  I sprayed it a little more and proceeded to wait for more magic to occur.
 After two hours, this is how it turned out, with the ropes and pine needles removed.
After a quick bath in 1 teaspoon of sodium bisulfate (Pro Anti-chlor from Pro Chemical and Dye) and 2 1/2 gallons of warm water, to neutralize the bleach, I dried it on the clothesline 
I had used to make the patterns and strung up among the trees in the back yard.  Once dry, I applied it to the quilt top and this how it turned out:


I think it turned out well.  I am now looking for an opportunity to lay it out on a large surface for basting because I have lots of ideas on how to quilt it.

This bleaching technique is definitely something you should add to your skill inventory as it it is so useful when confronted with dull, solid color fabric.  The plain cotton curtain over the window of my back door is now covered in various loopy designs after I used a bleach pen on it and some wonderful bright pink rayon yardage ended up with a bunch of lemon yellow speckles after bleaching using a spray bottle.  And check out this wonderful little quilt where the leaves seem to be floating on air.

BTW Paul says this quilt is a little girly because there is some peach in one of the fabrics.  I guess I can keep this one for the dogs and me to use because we don't care if it's a little girly.

Wednesday, May 30, 2012

The 1600" Quilt Revisited

Last October I wrote about the 1600" quilt concept.  If you don't remember that far back you can check it out here.

Go ahead and look at it now, I'll wait for you to get back.

That quilt was not a real 1600" quilt but it paid homage to the concept.

This past Saturday the Strip Club decided that we would all work on genuine 1600" quilt tops and even make it into a race.

The race part never really happened as we were very distracted by all the great food everyone came with including ribs from Sweet Sadie's.  Yum, Yum!

I did get my top done and this how it turned out:

This time I did use a real jelly roll of forty different 2 1/2" strips called a Bali Pop in the Coconut colorway.  It came out to approximately 66" x 50", a good size for a lap quilt but I wanted it to be a bigger 'snuggle up on the couch with two dogs' size.  So at the same time as I bought the Bali Pop I also bought a few possibilities for borders as all the batiks were on sale for $6.99 each... a real bargain these days.

Here's how the chosen border fabrics will not work with this quilt:

Actually I can't show you the border choices because Blogger and Google want to charge me for photo storage....WTF!

Take my word for it though, I am either going color blind or choosing border fabrics before a top is completed is never a good idea.

As my chosen border fabrics do not seem to be working I have two other possibilities I may try.  One is to border the whole thing in plain black with black binding so that it looks like a frame for the colorful strips.  The other is to experiment with bleaching out some of the black fabric that I have to see if any of it can be used as a wide patterned border of black and cream with a thin solid black first border and solid black for the binding.

Not sure how it will all work out but I am very pleased with how the top turned out and know that this will be a technique I will use again and again and again.


Tuesday, April 24, 2012

Twinkle Quilt

I am so excited that I was able to actually finish a quilt this past week.  I started Twinkle, from the Kim Brackett book 'Scrap-Basket sensations', back in January and it has taken me this long to get it together, basted and quilted.  A long drawn out process but I think it was worth it.


It came out at about 70" square which is larger than the original design because I added two extra rows.  The fabrics came primarily from my South African indigo stash of fat quarters with the stars all coming from the same piece of fabric that had four shades of yellow in it.  That outer border was actually ordered over the phone from Stitchin' Heaven when they ran out of the fabric that I really wanted for the border.  I think it all works together.

A surprise for me was that the indigo fabrics only bled a little in the wash.  I used a whole handful of color catchers and they came out bluer than they were before but not solid blue.  The lightest yellow looks a little duller to me but my fears of everything turning blue seem to have been misplaced.

This Saturday is another meeting of the Strip Club and I think we are supposed to be working on UFO's.  I'm going to bring something that has been sitting in my to do pile for several years...another quilt but totally different from a something made from strips.

If you like the quilts I have made from this book, go buy the book.  I have to buy another one as I destroyed my copy with large cup of cup with cream and sugar.  What a sticky mess!

 And even if Alex likes this quilt it will not go into the bathtub with all the other doggie quilts!

Friday, March 30, 2012

Puzzled

About ten years ago I participated in a Block of the Month quilt program based on the Yikes pattern from Maple Island Quilts.  Every month I got a lot of fabric to make four blocks in a variety of large size basic block patterns.  Even if you don't quilt you have probably heard of Log Cabin or Courthouse steps blocks.

Here's how it turned out:

Pink, turquoise, black and white batiks made for a dramatic quilt and the construction allowed for any inaccuracies to be hidden by offsetting the rows.  I worked for hours on where to place each block but, in the end, Lady Jane (my Italian Greyhound then) mixed up the blocks so the placement ended up more random and less pleasingly placed.  I still love it for its energy and cheerful vibe.

I was about an hour from finishing up the quilt top when Paul saw it and asked for it for his bed.  He moved out a couple of months later and I haven't really seen it in many years.

Fast forward about eight years...

I was at his place the other day and saw it in a heap in the laundry room.  Thinking I would do him a favor, I decided to bring it home and wash it for him.  I dumped it in a heap on MY laundry room floor and went to let the dogs out.

THEY WENT NUTS!  Sniffing it, pawing it, rolling on it and exploring under it all the while wagging their tales and making general happy puppy sounds before they would go outside.  Good smells mean that Paul has been using it a lot or that someone doused in  'essence of beef'.

Imagine my surprise when Kelis, while trying to get out from under it, got stuck trying to crawl through a hole in it.

A HOLE!

Not just one hole BUT THREE HOLES!

I should not be surprised as the dearly departed Kimora chewed on everything she could when she was a puppy and I am sure these holes are her handiwork.

I am not distressed by the holes, they only show that the quilt has been well used over the years and, as I always say, I make utility quilts not heirlooms to be preserved for future generations.

But really... three holes seem a bit much.

So this weekend I will be trying to decided what to do about this quilt.

Here are the options as I see them:

  1. Toss it out.  Not really an option a I still love it.
  2. Carefully patch it to invisibly hide the holes.  This could take a very long time to find the exact matching fabrics and may never look as it did when brand new and, with my luck, Alex will chew a new hole in it just to show he can do it.
  3. Patch it without concern for how it looks.  A black patch covering all three holes would make the quilt usable again but will not be very aesthetically pleasing.  Then again, a patch is a patch is a patch.
  4. Cut out one big hole, bind the edges and make it a doggy door.  I am intrigued by this solution as it would give Alex and Kelis a new game.  Then again, with my luck, I would get my foot stuck in it  and rip a bigger hole. 

So, while I am getting some work done this weekend (cleaning, planting and de-cluttering) I will be puzzling over what to do with this holes.

And Bill, I will not use red to fix it!

Wednesday, December 28, 2011

Hop Around Houston

Hop Around Houston is a shop hop around the vendor area of the International Quilt Festival.  It works just like a regular shop hop...you travel from specific shop to specific shop and purchase a little kit at each booth for a different quilt block using a standard set of fabrics.  Where I wrote shop substitute booth and you get the idea.  For several years I always  did the festival shop hop and I have completed a few of the quilts.  


Many years ago I did the shop hop, purchased a finishing kit from somebody, made all the blocks and quietly hid it away.


Yup, for some unknown reason I hid away a quilt top that was almost complete.


What was I thinking?


I have no idea what I was thinking but when it surfaced a couple of weeks ago, from a box of books to be discarded, I came across the pieces and decided to finish the year off with a completed UFO.


Yesterday I completed the quilt and here's what it looks like:


I like some of the blocks and others not so much...a danger with this kind of quilt making.  I had lost the instructions for the finishing kit so I finished it up on a wing and a prayer.  Some of the blocks did not exactly fit with the other blocks so I had to make some adjustments by adding additional borders and, in a couple of cases, I actually resewed the block to get it to the right size.


I like the size of about 68" x 88" as it is perfect for one human and two dachshunds cuddling on a lazy afternoon of mystery novel reading.  And, as Paul had absconded with a couple of quilts earlier this season, I needed to replenish my stock of cuddle quilts. 


Finishing off the year with a completed UFO is definitely a good thing.


Now on to working on my New Year's resolutions...or not!


Saturday, November 12, 2011

Bad Quilts That Make Me Smile

Okay, so there aren't any bad quilts.  What can be bad about three layers of coziness put together by loving hands?  


There are badly made quilts and I seem to be an expert in making them.


I just looked over my past quilt postings and each one of them seems to have included words like 'mismatched corners', 'blunted points', 'discarded blocks that didn't fit' or some such confession of piecing disaster.  I have noticed that most of my backings have a wrinkle or three in them and sometimes the quilting looks like a dog's breakfast.


But in each and every case, the final results have made me smile.  Whether it is because I have no idea how it all got done, or the fabrics have disappeared, or the blocks are of many different sizes, or the borders were 'made' to fit or wrinkles were quilted to within an inch of their lives.  They have made happy.


My latest Bad Quilt began in 1998 and I just took it out of the dryer this morning after a marathon quilting session yesterday.  I originally posted about it here.  If you look at that posting you will see that I finished the top this March and it took about another eight months to get it quilted.


Here is how it now looks....


I decided that I could not quilt it in simple straight lines as there were so many mismatched corners.  In the end I did find a few straight lines to anchor it all and then I quilted circles at various points to hold it all together.  I like the way it looks and I had a lot of fun(?) seeing if I could make two circles the same size one right after the other.


I couldn't.


This quilt does make me smile because of all the missteps in getting it made but the best part is that my oldest UFO quilt is now done!!


And isn't that something to smile about?

Saturday, October 29, 2011

Picnic Quilt

Saturday Strippers has been having a lot of fun the past few months working through the book Scrap-Basket Sensations by Kim Bracket.  This is a fabulous book for using either Jelly rolls or your own fabrics that have been cut into 2 1/2" strips.  Kim has a great way of putting together coordinated fabrics, of which you have limited quantities, with a larger quantity of another fabric to make beautiful quilts.  Check out the link to Amazon.com where some of the quilts are shown from the book and you will see what I mean.


Back in August (!) the project for us was the Picnic Quilt.  I did not make a very large quilt but I think it will work for Sweet Sadie's.


What do you think?


The fabrics are a bunch of batiks that I won as a door prize some where, the white is from Sew Crafty's closing sale and the quilting (I know you can't really see it) is a meandering leaf pattern I made up as I went along. The size is about 42" by 31" which makes it a nice little accent for the spring.


What really pleases me about this quilt is that I thought my piecing of the blocks was a little off but it all came together when I joined them together.  The outside borders worked out in the end even though I didn't really think through the placement.  Instead I used up some leftover pieces that sort of bring the design to the more solid borders.  


Surprise, surprise....Poor planning on my part did not make an ugly quilt... or at least I don;t think it is ugly.


This is the second quilt that I took to the Quilt Guild Retreat to work on that weekend.  I might as well have not brought it as all I did was take it out the basket, shake it out, and put it back in the basket.  I still have one quilt that needs to be finished up from that weekend.  I pin basted it and started quilting it last weekend at Saturday Strippers and I really, really plan on finishing it up before the end of November.  With the Houston International Quilt Festival next week I don't think I will make much progress until later in the month.


It is a chilly day in Houston for late October and I have many windows open in the house.  The dogs are not happy about that and have spent most of the day cuddled under multiple quilts on their comfy chair.  I don't think they will like it when I scoot them off so I can vacuum up some of the dog hair from the chair.  Maybe I will bribe them with treats?  Chicken jerky or Greenies or both?

Wednesday, October 19, 2011

Heart and Home BOM Done!

Back in June of this year I wrote about finishing up this quilt top.  I put it on the pile of things that needed  to be quilted and, quite frankly, proceeded to forget about it.


Along came the KAQG retreat and, while trolling for things to bring with me, up popped this little quilt top.  Into the basket of things to do, while away, went this funny little quilt top along with safety pins for basting, black batting, black backing and binding fabric and black thread.  I even brought to retreat my sewing machine that does great quilting rather than my usual travel machine.


Piece of cake, right?


WRONG!


Once I started basting the quilt sandwich together all my negative feelings about this quilt came out with a vengeance.  My poor applique technique, my inability to center the central house block, the unevenness of the border fabrics and my inability to keep the instructions with the quilt pieces all came together to make me one grumpy girl.


Why should I put any time into making a quilt with such bad vibes?


Ever a Pollyanna, I decided to make this an exercise in improving my quilting technique.


I don't know if my quilting technique has gotten any better but this is how it all came out:


Since my hands have not been working very well I did not attempt to do any fancy feathers but I did add some fun things to the quilting.  In each of the blocks with the hearts I quilted in the names of dogs I have loved, my family members, cats I have tolerated, people that have lived with me who aren't family members and lots and lots of little hearts.


I am now in love with this quilt as, even though it is poorly made, it will bring a smile to my face when I see it and think about all the names memorialized in it.  Before it was done I was intending to give it to the dogs for their collection but now I think I may hang it on the wall where I can see it every time I go up the stairs to do some sewing just to remind me that a crappy quilt can be saved with just a little imagination.


And, just for some fun, this is how the bath tub/dogs' bed looks like when I go to wake the dogs up in the morning.
What?  No dogs!  Where did they go?  


This particular morning Alex finally poked out his nose from under all the pillows and quilts he prefers to sleep under to see if I was serious about getting them up for a run outside.  I had to go digging for Kelis as she wasn't ready to get active yet.


  With the cold weather coming, I hope you and yours are as cozy and warm as Alex and Kelis are very night.  If a quilt would make that happen for you, let me know.  I could always send you another of my crappy quilts....whenever I get the next one done.

Saturday, October 15, 2011

Not a 1,600" Quilt

There is a somewhat popular quilt pattern out there called the 1600 inch quilt.  Essentially you take one jelly roll of 40 different, 2 1/2" wide, 42" long, strips of fabric.  Sew them end to end, then fold in half and sew the long edges together.  Keep doing that and you will end up with a 48" x 64" quilt top.


Did I mention that you are supposed to sew the ends together at a 45 degree angle?


Here is a link that shows you the concept and even a video on the procedure.


Where am I going with this?


A young man I know is a new father and I would like to give him a quilt for his new baby girl.  The problem is that I don't have much of a stash of baby fabrics that I thought would work for a very girly quilt.


Along comes the ever creative Janetta who suggests that I make one of these 1600" quilts and she just happens to have a bunch of girly fabrics that would work for it.


Janetta came up with 10 fat quarters of coordinating pink/brown/cream prints and I was off to the races.


I ended up cutting about fifty 2 1/2" wide, 22" long strips of fabric for my quilt.


Yes, that does not add up to 1600 inches made up of 40 different fabrics but I figured it would all work out in the end.


Here is what I came up with:


It came out to 35" x 58" and I do intend to add a border or two of beige/brown/pink fabrics.


Did you notice that I did not sew the strips together on an angle but straight on?


This quilt, so far, has taken about two episodes of Criminal Minds (off the TiVo) to get it to this stage.


Another episode or two and I should have it bordered, basted, quilted and bound.


Not bad for a quick baby quilt.


Next time I will definitely angle the joins of the strips!   

Friday, October 14, 2011

Quilt Retreat 2011

Need I say more?
The beginning of a quilt by the retreat crew for our next auction....LOVE IT!


OMG!


A simple bright fabric center encased in simple borders...brilliant!

A clever husband drew out this quilt pattern on plywood.

Irish chain updated for Jelly Rolls

Check out those clever prairie points.

these colors will keep you awake

For our lone knitter

Sunbonnet Sue gone Hallowe'en.

Secret Sister gifts


Love this!

As declared by the maker...'One ugly charity quilt!'

Beautiful quilt... and look at all those cords!

Hundreds of safety pins!
Of course I can say more.


My own output was very slim for the weekend.  I did get most of a little quilt quilted (not shown above), cut fabric for a simple baby quilt, watched a couple of movies, played computer games, worked on my knitting and read most of a book on Brain Games for Your Dog but most of my weekend was spent just relaxing in a lovely location.  Camp Allen is just outside of Navasota, TX, home to W. C. Mercantile, a great little yarn shop, and three of us made a pilgrimage there on Saturday afternoon.


What I love about sewing retreats is the opportunity to get away from it all and do what I want when I want without concern for laundry, meals, or dog walking.  The fact that I can get some concentrated sewing time is just a bonus.


What I hate about sewing retreats is all that concentrated time with a small group of people.  I live alone with a couple of dogs and tend to do my own thing.  Imagine my surprise when I heard later that some of the attendees seemed to note how I spent my time.  I didn't notice what most of them were doing, just the results of their work.  


I've really got to get out more!


One thing I did do on my own was go in search of a screw for my sewing machine.  I ended  up in a small hardware store in Hempstead.  They sent me to a former sewing machine repair store in search of my screw.  I never found the screw but I did find a new member of my pack.


Meet Pierre:
He has settled into a spot in front of the fireplace and Alex and Kelis have accepted him as just an other odd thing in the house.  He has Alex's anatomy, Kelis's coloring and Kemora's face ...  all for a unique mix of Dachshund traits.


Would I go on another retreat...probably.  I have been on several corporate retreats which are very similar and several sewing ones in previous years.  2012 may be the year that I spend retreating....there is a knitting one coming up in February and one in April for the sewers and, of course another quilt guild retreat in September.  Now that I know the venue so well I will be able to take advantage of all it has to offer like hiking trails, a meditation labyrinth, and I might just make it onto a horse for trail ride.  Of course, Navasota deserves at least a few hours exploring it's unique shopping district.


It could be a great year! 

Thursday, September 8, 2011

Quilt Across Texas Shop Hop - Part 1

Those wonderful folks in Quitman, TX at Stitchin' Heaven have come up with a great way to force traffic into a lot of quilt stores in Texas.  They have created a shop hop of about 90 stores, in eight different regions spanning the whole state of Texas and we quilters have a whole month (THIS MONTH!) to visit as many as we want or can for a chance at some pretty spectacular prizes.   Called the Quilt Across Texas shop hop it gives people like me an opportunity to see different shops, explore the back roads of Texas and to find unique quilt related items that are not available through the big distributors while hoping for a big prize.


Today is the day that I started my adventure.  There was a little method to my madness.


First of all, I wanted to see how Alex and Kelis would handle a long car ride.  The shop I went to today was 75 miles away which seemed like a good test of their ability to tolerate my ignoring them as the miles flew by.  


Kelis handled it like a pro.  She spent most of the trip sleeping in the back seat on an old wool afghan.  Good Girl!


Alex, on the other hand, spent most of the trip whining and trying to get between my face and the wind shield.  When he wasn't in the front of the car driving me nuts he was laying on the shelf behind the back seat with his head wedged between the head rests looking for to all the world as a dog getting ready to heave up his breakfast onto the the back seat.  


Maybe I'll try drugs on him next time.


The shop I visited made all the Alex drama worth it.  Heavenly Threads Quilt Shop is a delightful little store in Trinity Texas with a sweet owner and a Chuweiny(?) named Lucy as the shop dog.  Lucy got to meet Alex and Kelis and really didn't know what to do with them.  Alex made several attempts to sniff her in her nether regions so no wonder she wasn't interested!


The shop is in an old house, well signed and contains many things for the quilter including several civil war themed prints, embellishments for art quilts and a broad range of fabrics.  Patricia, the owner, recently published her first pattern which combines an appliqued cowboy boot with blue jeans into a nice wall hanging.  It's not on the website but you can see mine if ask nicely.


My hear sung a little when I saw her backing ready bolts of fabric for 50% off and her pillowcase kits for $5.00 each.  I have enough backing fabric for a small quilt factory but the pillowcase kits will be used almost immediately for a project I saw on Facebook.  Country Living Quilts (1816 CR 427, Marquez, TX 77865) is collecting pillowcases for those who have been burned out of their homes due to the huge wild fires around Bastrop, Texas.


 If I am ever near this area again, I will definitely stop in and enjoy all the quilt goodness here.


And that's the other method to my madness.  This shop is WAY off the beaten track for the shop hop.  When I mapped out everything else in that region, all of the other shops are concentrated between Houston and Austin except this one.  Making it to that shop while doing the other shops would be a bit of a pain so doing it by itself made sense to me.  


I also got to enjoy some very pleasant back roads.  I drove up to the shop through a lot of construction on I-45 but came back on a lot of country roads so I could stop and have lunch at Florida's Kitchen in Livingston. Yum, Yum!


I love back roads in any part of the world and today was no exception.  For a while I followed an old boat trailer with a skiff on it.  The trailer had weeds growing on it and the boat lost little bits of itself as we bumped along the road. I wonder what they were going to do with such an unseaworthy vessel after they left the road at a public boat launch?  They may have been thinking about sinking it in the lake, but the drought had made the lakes so shallow that I don't think they would have been successful.


I saw no evidence of wild fires in the area (a good thing!) but I did get to see how low some of the lakes and streams are in this area.  At one point there was an ugly stench coming through the air vents. Before I panicked I realized that the smell came from rotting vegetation exposed by the dropping lake levels.  Glad I don't have a home near there! 


The next part of hop that I will attempt may include an overnight stay somewhere as the distances are pretty significant...especially if I want to loiter at any of the stores.  Kelis will go to Paul and Alex has been offered a place at his foster family's home.  I just have to get the planning done so I can firm up the dates.


If you are in Texas check out some of the stores you have never visited before for a road trip treat.  If you are out of state...see if you can get one going in your state.  Shopping, back roads and unique quilt related stuff will make it all worth the energy to make it happen. 

Saturday, June 25, 2011

Saturday Strippers 06/25/2011

Today was the June 2011 edition of the Saturday Strippers and what a wild time we had.


Okay, that's a slight exaggeration but I think everyone enjoyed themselves and we did solve all the troubles in the world...maybe not world peace and the elimination of hunger but other issues just as important to us like bathing suit shyness, the benefits of exercise for some friends, how to get a charity project completed without a lot of support and the issues around parenting older children.


The quilt for this month was the cover quilt on 'Scrap Basket Sensations' and was worked on by four of us.  


Here are a couple of examples of what the block/quilt will look like when it is done:


I did work on the blocks but mine were packed up and in the car by the time I took pictures of everything.


Besides four people working on the selected project one of us made a quilt for her four year-old great-grandson.


Someone else made about 25 flannel baby blankets for the local charity hospital:


Two others did not sew at all.  One worked on cutting out wheel chair bags (she got twenty 'kits' all ready to sew) and the other worked on getting all her cut pieces in order to sew later.


Our final pair, a grandfather and grand daughter combo got a little sewing done and wowed us with grandfather's thread guide invention made from an old soda bottle and some PVC piping.  I expect to see it soon offered for sale on Etsy!


Next month we are going to have a UFO day to finish up these quilts as none of us got enough done today to actually produce a quilt top.  If you are local to me, please come visit us on the fourth Saturday of the month for an afternoon of sewing relaxation.  We may not solve your problems but you may come away with a project completed and who can argue with that.  

Sunday, June 19, 2011

Heart and Home Block of the Month Quilt

I was digging around in the shoe boxes full of quilts to be made and came across one that I don't remember much about.  As seems typical of me, I had most of the fabric parts but none of the written instructions.

It has to be a good six to seven years old and I thought I had discarded it into the Quilt Guild Garage Sale.

Imagine my surprise when I examined it and discovered that most of it had been completed and all it needed was a little creative license to insert the middle block into the center of the 80% completed quilt.

After a couple of hours of recalculating the amount of border fabric I needed for the center block (and never getting it right) I came up with this:

I think the Block of the Month program it came from was to teach me applique skills but, from what I remember, all the instructions said were things like like cut out hearts, fuse to block, stitch raw edges.  No real instructions or hints on how to make it better BUT I did try a number of techniques I will never try again.

Look where Kelis is sitting.  That block is supposed to be a Grandmother's Flower Garden block; all hand pieced from little bits of fabric using paper octagons as the foundation.  It should have looked something like this:
Let's just say that mine was a more more free form interpretation of an octagon.  I will probably never try this again but the primitive nature of my work will put a smile on my face for many years to come.

I will add this to my slowly growing pile of of odd quilt tops I have completed lately and finish them up when it will be way to hot to leave the house.  That may be tomorrow!

On a final note... here is Alex is the middle of my dead lawn trolling for things to chew to keep his teeth clean like pine cones, twigs and gum balls (look like thorny chestnuts).
Have a good week!  Mine will be busy with three water aerobics sessions, a doctor's visit, a bone scan, two afternoons at Work Shop Houston, a meeting of the 'other' quilt guild, a meeting of the Knitters North of Town,  relaxing with the Friday Knitters, book work at Sweet Sadie's and, to top it all off, Saturday will see another gathering of the Strip Club.

Now I need a nap!